Duplicate data is a big problem in Excel. It messes up your totals. It breaks your reports. And it is hard to find on your own. The good news? Excel has fast ways to fix it. This guide shows you all of them.
What Are Duplicates in Excel?
A duplicate is a row that shows up more than once in your data. It has the same values as another row.
Duplicates happen a lot. They come from:
- Merging two lists together
- Importing data from a database
- Collecting form replies
- Manual data entry over time
There are two kinds of duplicates:
- Exact duplicates — every column in the row is the same.
- Partial duplicates — only some columns match. For example, same email but a different date.
The type you have decides which method to use. We cover all of them below.
Before you remove anything, save a copy of your file. You can also copy your sheet to a new tab. If you delete the wrong rows, you can go back. Once you save and close, deleted rows are gone for good.
Method 1: Remove Duplicates Button — The Fastest Way
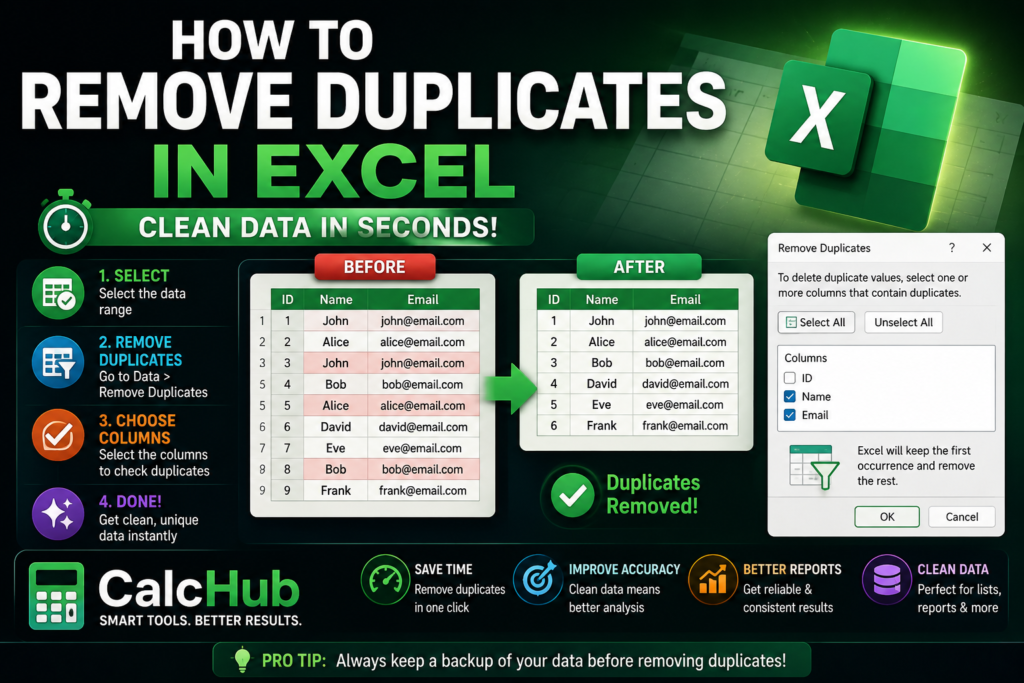
This is the quickest method. It takes about five seconds. Excel has a built-in button for it. You will find it in the Data tab.
Use this method when you want to delete duplicates for good and keep only unique rows.
Click on any cell in your data. Excel will find the full range on its own. You do not need to select everything manually.
| A | B | C | |
|---|---|---|---|
| 1 | Name | City | |
| 2 | Ali Hassan | ali@email.com | Lahore |
| 3 | Sara Khan | sara@email.com | Karachi |
| 4 | Ahmed Raza | ahmed@email.com | Islamabad |
| 5 | Sara Khan | sara@email.com | Karachi |
| 6 | Zara Malik | zara@email.com | Lahore |
Rows 3 and 5 are the same. Same name, same email, same city.
Go to the top ribbon. Click Data. Look for the “Data Tools” group. Click Remove Duplicates. A box will pop up.
Data Tools→
Remove Duplicates
You will see a list of your columns. Each one has a checkbox. Leave them all checked to find exact duplicates. Uncheck columns you do not want to compare.
Which columns should Excel check?
Excel removes the duplicates. It shows you a message. You will see how many rows were removed and how many are left.
4 unique rows remain.
| A | B | C | |
|---|---|---|---|
| 1 | Name | City | |
| 2 | Ali Hassan | ali@email.com | Lahore |
| 3 | Sara Khan | sara@email.com | Karachi |
| 4 | Ahmed Raza | ahmed@email.com | Islamabad |
| 5 | Zara Malik | zara@email.com | Lahore |
When Excel finds duplicates, it keeps the first one. It deletes all the others. If the order of your data matters, sort it first. Put the row you want to keep at the top.
Method 2: UNIQUE Formula — Keeps Your Original Data Safe
The UNIQUE function works in Excel 365 and Excel 2021. It does not delete anything from your data. It makes a clean list in a new spot. Your original data stays the same.
Use this when you want to keep the original data and work with a clean copy somewhere else.
// array — your data range
// by_col — FALSE for rows, TRUE for columns
// exactly_once — TRUE = only values that appear once
// FALSE = all unique values (use this most of the time)
Simple Example — One Column
Your data is in column A. You want a clean list in column D. Just type this in cell D2:
// Shows only unique values from A2 to A100
// The list updates when you change the source data
Full Table — Many Columns
Want unique rows from the whole table? Use the full range:
// Shows unique rows from columns A to C
// A row is a duplicate only if all columns match
The UNIQUE formula updates itself. When you add new data, the clean list updates too. You do not have to run anything again. This makes it great for reports and dashboards.
Method 3: Advanced Filter — Works on All Excel Versions
Do you use Excel 2016 or older? Then you cannot use UNIQUE. Advanced Filter is the best option for you. It copies a clean list to a new spot. It does not change your original data.
Click on any cell in your data range.
Go to the Data tab. Look for “Sort & Filter.” Click Advanced.
Sort & Filter→
Advanced
Choose “Copy to another location.” Set the List Range to your data. Pick an empty cell in the Copy To box. Then check “Unique records only.” Click OK.
This is what tells Excel to copy only the unique rows.
How to Find Duplicates Before Removing Them
It is smart to review your duplicates before you delete them. Some rows look the same but are not. Here is how to highlight them first.
Use Conditional Formatting
Click on the column header. For example, click “B” to check the Email column.
Go to Home tab. Click Conditional Formatting. Then click Highlight Cells Rules. Then click Duplicate Values.
Conditional Formatting→
Highlight Cell Rules→
Duplicate Values
Choose a color. Red is the most common choice. Click OK. All duplicate values will light up. Now you can see them before you delete anything.
Use COUNTIF to Count Duplicates
You can also add a helper column. It counts how many times each value shows up. Any number above 1 is a duplicate.
// Counts how many times B2 appears in the full list
// Result of 2 or more = duplicate
// Filter this column for values greater than 1
Remove Duplicates Based on One Column Only
Sometimes you only want to match on one field. For example, you want one row per email address. The name or date does not matter.
In the Remove Duplicates dialog, uncheck all columns except the one you care about. Excel will then only compare that column.
| A — Name | B — Email | C — Date | D — Keep? | |
|---|---|---|---|---|
| 2 | Sara Khan | sara@email.com | Jan 15 | ✓ Keep |
| 3 | Sara K. | sara@email.com | Mar 22 | ✗ Remove |
| 4 | Ahmed Raza | ahmed@email.com | Feb 10 | ✓ Keep |
Uncheck Name and Date. Check only Email. Excel removes the second row with sara@email.com. It does not matter that the name and date are different.
Common Mistakes to Avoid
| ❌ Mistake | What Goes Wrong | ✅ The Fix |
|---|---|---|
| No backup | Deleted rows are gone after you save | Copy your sheet before you start |
| Checking all columns when you should check one | Misses partial duplicates | Think about what makes a row a duplicate for your data |
| Data not sorted first | Wrong row gets kept | Sort your data so the right row is on top |
| Extra spaces in cells | “Sara” and “Sara ” are seen as different | Use TRIM() to clean spaces first |
| Mixed upper and lower case | “SARA” and “sara” are seen as different | Use UPPER() or LOWER() to make case the same |
| Active filters on the sheet | Hidden rows also get deleted | Clear all filters before you run Remove Duplicates |
Clean Extra Spaces Before You Start
Extra spaces are hard to see. But they stop Excel from finding duplicates. Use TRIM to fix them:
// Removes all extra spaces from a cell
// Copy the result → Paste Special → Values only
// Then run Remove Duplicates on the clean data
Which Method Is Right for You?
| Method | Best For | Changes Original Data? | Excel Version |
|---|---|---|---|
| Remove Duplicates Button | Fast one-time cleaning | Yes | All versions |
| UNIQUE Formula | Live reports and dashboards | No | Excel 365 / 2021 |
| Advanced Filter | Older Excel, copy to new location | No | All versions |
| Conditional Formatting | Review before removing | No | All versions |
Frequently Asked Questions
Excel keeps the first row and removes the rest. You do not need to do anything extra. Go to the Data tab. Click Remove Duplicates. Pick your columns. Click OK. The first copy of each duplicate stays. All others are deleted.
Yes. Press Ctrl+Z right after you run it. This will undo the action. But once you save and close the file, the rows are gone for good. Always make a backup copy before you remove duplicates.
There is no single-key shortcut. But you can press Alt, then A, then M on Windows. This opens the Remove Duplicates dialog. You can also add the button to your Quick Access Toolbar for one-click access.
Open the Remove Duplicates dialog. Uncheck all columns except the one you want. For example, keep only Email checked. Excel will remove any row where the email has already appeared. The name and other columns do not matter.
The most common reasons are extra spaces, different letter cases, or numbers saved as text. Use TRIM to fix spaces. Use UPPER or LOWER to fix case. After that, run Remove Duplicates again. Most of the time, this solves it.
Yes. Remove Duplicates works on all rows — including hidden ones. Clear your filters before you run it. This way, you will not delete rows you did not mean to remove.
UNIQUE is a formula in Excel 365 and 2021. It shows a clean list in a new place. It does not delete or change your original data. The list also updates on its own when your source data changes. It is great for reports where you need live, clean data.
Need to Run a Quick Calculation Too?
CalcHub has free tools for percentage, discount, BMI, age, and more. No sign-up needed.